Today I worked on the credit for our film opening.
The font I choose is this following font. Which isn't too thin or too thick, and it has an worn out style to it. Inspired from the font of the opening of the movie Se7en. Coming up with the names for our credits, I used the random name generator to come up with the names.
After coming up with the name, I then start to put the credits in our opening by using after effects.
I used the text behind motion effect that I've learned previously. It took me really long to mask each frame and make changes as I had to continuously freeze and unfreeze which took some time.
I'm helping out on the adding the credit part of our film opening. I did more research on the font.
As in the film, the character uses brick as a writing tool, so I think that using this crayon like effect font can be related to the film. However, this font maybe too thick.
Also, considering that handwriting font is what we want and the previous font that I've found are too thin which can't be clearly seen. This font is thicker and the fact that we don't want it to be neat perfect writing, this font gives a worn out feeling.
First, create a mask then apply the blur effect on. Change the value of the mask expansion and feather to make it more blend in with the text animation.
Then you create a new layer - Camera to play with the zooming out effect. Which this layer is also connected to the null layer.Which is copy and paste on each animation.
Finally, making changes such as adding the glow effect, colour correction and changing the curve value making the text appeal more contrast.
YOU GET THIS. AFTER MAKING LOTS OF CHANGES TO THE VALUES, LOCATION, AND COLOUR.
Now working on the effects. Start with applying the effect "CC ball action"
Then to create the effect, you use Ellipse tool to create the mask layer.
Then after creating the layers, you start working on the animation. By setting keyframes and changing the value. Which to create the scatter and rotation of the particles.
You create 3 layer of the effect and then off set them so you create 3 different time that the particles come back together.
Lastly, combine them together by selecting all three animation and make a new composition out of it.
This is the what I finish creating today. Overall, I had to spend lots of time adjusting the effects, such as the size, rotation angel and how scatter the particles. Also getting the right timing really makes a difference.
I decided to re-do the animation that I can completely finish and use for my course work. I decided with Nana to use this effect.
Today's Aim: Create the text and finish the design.
It had 3 layers of text that needed to be linked to the first and by changing the position it creates a 3D look. The challenge for me today is to adjust for the right gradient position and color for the text to make it realistic.
HERE IS THE FINISHED TEXT.
To enhance the sense of 3D, the effect CC light sweep is added.
I decided to focus on the intro of the film. I look up for some tutorials of text animation on youtube. Here is the one that I decided to try.
OUTCOME..
STEPS:
I downloaded a new font to use, which is called "Open 24 Display" As it gives a more digital look.
Unfortunately, the file that he provided to make the effect ( including the background picture and light effects) can't be downloaded. However, I did get to download similar picture from google to use it as background picture. That is the picture that I used.
By changing the Track Matte to Alpha it then creates the metallic look on the font.
Lastly to change the colour by changing value on the curve. The add effects such as CC glass and CC Blobbylize to create the reflection look
Today I decided to learn this effect because I think it might be useful to included in our opening credit. This is the link that I learn the effect from..
It's a quick easy tutorial which is by using Roto brush & Refine edge which it can auto mask your object which makes it every easy.
However, it is a bit time-consuming as you need to check every frame and make an adjustment to it, also after finishing every frame that you want you to need to remember to "freeze"it so the effect can work.
Then you add the font on the footage. Remember to put the text layer below the video footage.
After finding the different fonts, I decided to try and the glitch effect on to it. In order to do this, I search on glitch effect tutorial on youtube and try to learn it as i go.
The video that I looked at is the following video. The whole video is 15mins but it took me awhile to follow as I was just introduced to using After effect.
OUT COME...
STEPS....
The video uses his logo but I decided to use the phrase " Hello Charlie" as it relates to what I'll be doing (imaginary friend). All the resources used in the making is all link in the description of the video.
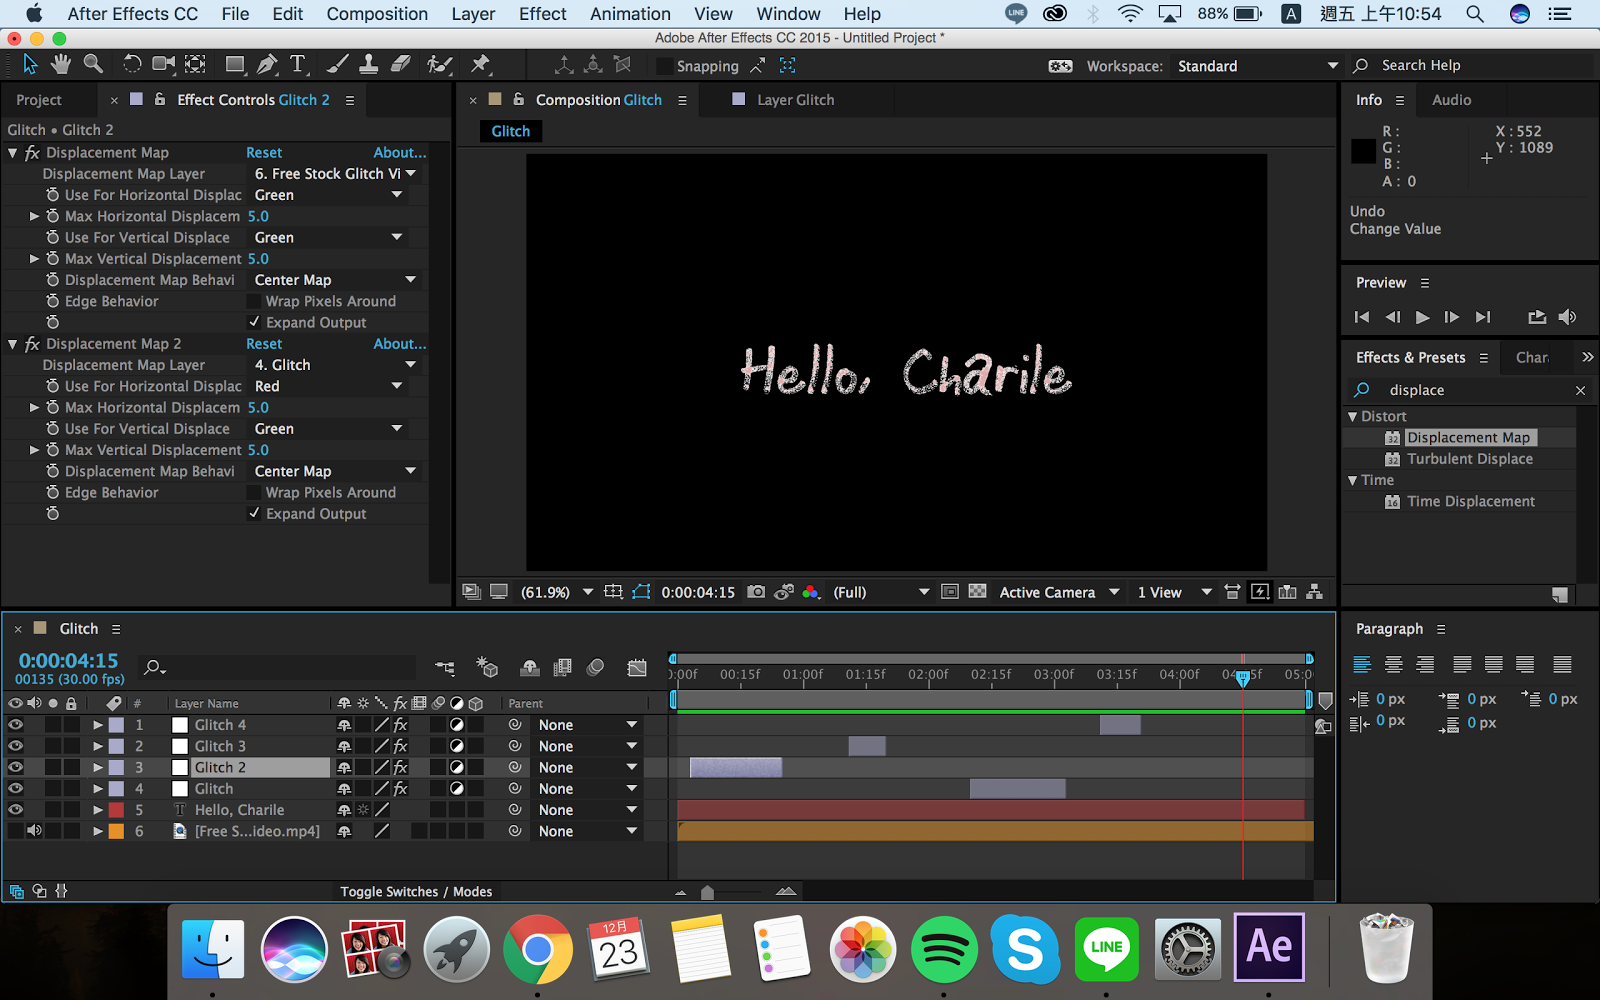
After creating the composition settings, the first step is to import the glitch video and then create the layer Hello Charlie.
You then create an "Adjustment layer" and then add the effect "Displacement map" and select the glitch video which will effect the actual video.
Next step to create the moving action, you replicate the glitch effect and spread it throughout then change the max horizontal displacement value and the max vertical displacement value.Make sure to make it random.
After createing a new layer call newell object name it "Split" then apply the effect slider control and then lock the layer.
Now we need to work out the show of the three different colours, RED, GREEN AND BLUE. In order to do this, you replicate the font layer 3times. To change the colour you apply the effect levels(individual colour control) to all three layers, then don't make changes to the colour your want and turn the colour output white from 255 to 0 for the other two colours. Also, change the mode of red and blue to screen.
Then open position for the red layer and clip the stop watch while holding the "alt option" on the keyboard. Which will open up the expression position then type in wiggle(10, and then drag the spiral looking icon to the split layer and close it with another parenthesis.
Then change the value on the slider effect, this will create the split of the RGB colours.
Now we have to create keyframes. Create a keyframe just one keyframe before the glitch effect ( value 0 ) follow by another keyframe in line with the glitch ( value 20). Do this to the start and end to all effects. This is to create the shifting of the RGB colours. To smooth down the effect right click and go to key frame assistance and change to easy ease.
Then create a new adjustment layer (name it TV effect) and apply the effect bad TV 3 -weak. Then open up the pen tool create a selection of the mask.Again create small section then replicate and spread it out (keep random).
As we are focusing on imaginary friend, I did a search on children's hand writing. To get an initial ideas on what font we might be using in our opening.
I then look up fonts on the website "Dafont" and found some similar fonts.
Sam Handwriting by Sam Horne
Sign handwriting by Fontscale.com
Mouse Handwriting by Sahara
Grunge Handwriting by JLH Fonts
Inspired from the opening credits from the film "Se7en", me and Nana really like the glitching effect used.